1st week 28th, February 2018

This project provides me with an
opportunity to improve my portfolio and Practical skill on my preference and my
creative ideas in a direction that I have personally fond as important for my
creative development.
The creative process itself is
rigorously documented and reflected upon in order to provide numerous
opportunities for self-improvement
This project is catered to allow us
to decide what technical discipline we can improve on based on previous
projects that we have done this year.
The thematic and practical approach
are for us to negotiate with our lecturers in this project; however if we wish
to consider working from a jumping off point we have been offered on the
following:
- Interior environment:
- Urban Exterior Environment:
- Prop/ Asset:
- A game
- An animation
-
A 3D model - A character design-Environment design- Vehicle design-Creature design
- A Concept art -A character design-Environment design-Vehicle design-Creature design
Extended Diploma in Art & Design
Mind Map


Mood Board
Mood Board
Of
Vehicle Design
Mood Board
Of
Creature Design

Mood Board
Of
Character Design
Mood Board
Of
Environment Design
09/03/2018
Vehicle parts
I was working on some of my idea of vehicles. At first I made some sketches of parts of vehicle

12/03/2018
I didn't realise that vehicle is going to so easy to make it.But this are just my experiment.
14/03/2018
I have been looking for something interesting that's way I am making lots of silhouette to find my perfect project.
This silhouette were from statue or sculpture
Here some of them i have used just sample brush and for some of them I have used different brush then I found some very interesting shape then I started develop them.

Here I finally come up with an idea that what should I have to develop farther, The idea is about making a character is about a warrior. I found this is quite interesting because of this is going to have some different features like creatures look medieval look.
Unit 8 Project Proposal
MIND MAP OF THE CHARACTER
26/03/2018
In this stage I am looking for my body shape and perfect pose for my character.

I have to start from torso that's why I have find anatomy picture of torso because i have to add some other stuffs to that body so I need a perfect body shape of x and y view port of Maya.

The Drawing Academy is an online Drawing Course and Art Community, where you can learn how to draw in the comfort of your home, and benefit from the support of Academy tutors and fellow students.

28/3/2018

Analysis
I have found my character position from Eadweard Muybridge, 1955, The Human Figure in Motion New York: Dover Publication, INC. I was looking for some action motion on that book. I found that action from boxing section. I choose that position because of I wanted to show my character as a revenge expression. I have drawn some sketches of my character. I will do some more lately. For making any character either in 3D or in 2D we have must need a models. I already got that how would my character should look. It was going to perfect to make a 2D character but I was doing 3D model so I need at list 2 of my perspective view of my character position.
To get that position I have used an app called easy poser. The speciality of that app is if you want a specific pose for your character you can get that from here because it has bodies of female, male and kids. Those bodies has got moving control of their knee, elbows, legs and hand etc. I have download that on my phone then I made my pose and I took some snap shoot of character pose. To make my torso I have used anatomy sketches of different views it has showing abdomen and all the nerves. I choose that because I will make some of my character nerves came off from skin. I have to make my character as a dead man that’s way character will have some creature stick look. To make that I thing that idea would be perfect.
30/3/2018
5/4/2018
Easter Holiday
Over Easter I have visited some places and walk around Birmingham Broad Street area where I found sculpture I have taken pictures.


I have visited a shop of sculpture before Easter to get some idea of my character some I have posted in mood board


Over Easter I have started working on head

Developing the legs and the hands
16/04/2018


18/04/2018
Foot making process
20/04/2018

To make the foot I took a picture of foot from internet from the easy poser image I have got foot images as well but it has not proper details on it. It is just sample plain model. For the foot making processing I need a picture with more details, that’s way I took the upside picture for the Z view port. And I had to use the easy pose image for the Y view port. Foot was not easy to make because of his shape and some fingers but i did not had to worry about that because of I have made shoe of that character directly from his foot shape. I made the half the shoe first then I just mirror that shoe after that I had to edit and add some more vertex at the front side. Both the shoe are same so I had just mirror them.

Here I have start developing some stuffs of his torso.


23/04/2018
This is a fist making processes


I have rendered that fist and it came up like that.


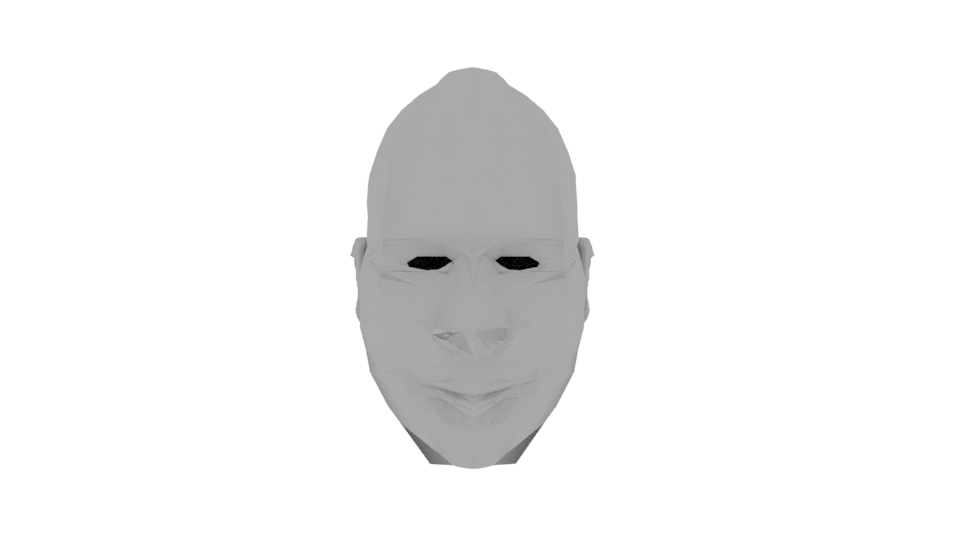
Head making proceses
25/04/2018


As I took a polygon sphere to make my character head I have got one top vertex and one bottom vertex. the bottom vertex I drag that to the bottom of jowl then I found the perfect shape of cheek.
on his eye portion I have put a little polygon sphere just to know where his eye position.


Here I have started developing his mouth. making a shape of lip was quite heard. I had to add couple of vertexes by adding edges from multi-cut tool.

Hear I was making nose, for nose I have just add few more edges.


I had made the head in different Maya file that's why I had to import the Maya head file into the Maya body file. after imported that file the head came up in the middle of the body it has make my way easier I just had to drag up the head to neck. Although that head is quite big I have made that small as a shape which is going to adjust with his body.

Here I have started merging the vertexes of his body and his his head. although his head has more vertex rather then his body I had to fix it by getting rid of some vertexes. I had to add few more edges in his neck. before starting all of that I had to made a hole in his head because there were no hole in his head by deleting some faces, head was a round shape. Then i have made both the object as same object by using combine option from the modelling toolkit bar. after that I have started merging the vertexes by using the target weld tool. after all of that added it came up with smooth shape of neck.


I have post some pictures of his neck form different angle.

From the back and side looks of neck.

21/04/2018
Ear making process
I was looking for some images of ear then I realise if I made the ear in same Maya file where I have made the head that is going to be easy I have had images of my ear and even they have already customise as same size.

To model the ear I have started with the polygon sphere. I took the sphere because our ear has got round shape and if you see at back of ear you can see the ear is bit look like mountain. First I put the sphere in his place then I have started placing the edges in similar to my ear shape because some vertexes I have to dragging in and some of them I have to pull them out to make a shape of ear.


After I have finished my character ear I have rendered it and It came up very real stick in above picture. I all so did a little experiment with the ear as I have made the ear in same Maya file of head. I have mirrored both of them head and ear and then I have rendered.


After It has rendered


I have started developing The hair in same file of body. first I took the polygon sphere and make it as same shape of the character head and cut faces from the front side and ear side. I have shaped it as where our hairs are grow. here you can see it's whole but I actually mirrored that.
30/04/2018


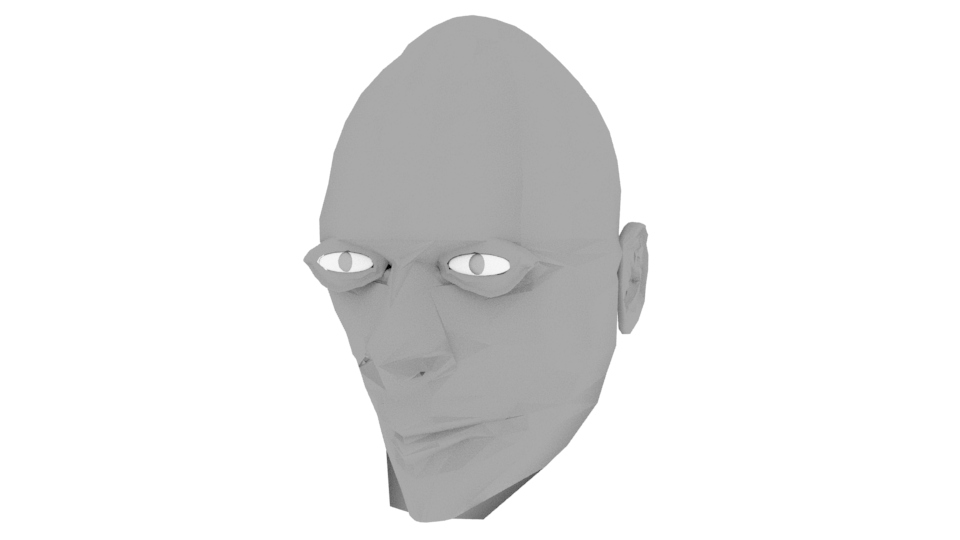
Eye making

For eye making I have used same technique which I have used for the ear making. here I have used 2 polygon sphere and one polygon plane. by the polygon sphere I made both of them slim and bit flat and the plane polygon I have just extrude it's all edges according to how the picture of my eyelid is leading.

Here I have done a small experiment with whole eye, I have rendered all of them head and ear and eye together to see how does it look like after it's rendered.


This images I have took after attached the eye to his face.

That was vehicle I have made that before I start that the character making. so I planing to use that for my character presentation.

 This vehicle was bit different I have made few changes to make it more attractive I have add a fence over the both wheels and I have made it smooth by click the 2 key button on keyboarded in Maya. then it turns up like that picture.

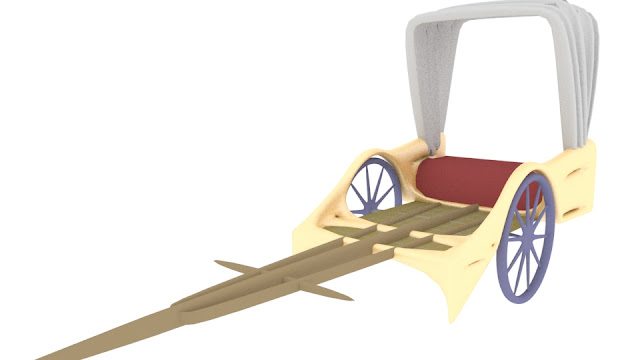
I have add few colour to make it more attractive

Here I have imported the vehicle in to my character Maya file.

I have add a skydome light and add a picture to the skydome to get best reflection of the object.
I have got the sky picture form that website http://vterrain.org/Atmosphere/Domes/.


11/05/2018


14/05/2018


I found
something very interesting concept to make art for game or animation, you have to make either in 3D or in 2D. If it’s a 2D game or 2D animation you
do not have to make any 3D asset or object and you do not have to use any 3D
software. That’s why I made my mind that whatever I am going to make I will
make it in 3D. Because for a 3D asset or object if we want render it we must
have to use some 2D software to make some texture.

On this mind map I have tried to figure
out the way of concept of my project. How easily I can find my project concept.
I found some of the way are very useful. Some of the ways I have learned last
year and some of them are from this year. There are useful way I like to
mention is find a reference images, object and another methods is you can use
any picture as creature reference images all you have to look at his body parts
how the head, hands and legs would be if you use a vehicle images as a
reference. That Mood Board has few picture of vehicle that can use as reference
of any creature.
I collect many
picture as much as I could just to set my mind on a specific project. The
sources I have used for collecting this picture is some of them are from
internet and some of them from real sculpture or statue and games scene.
Mood Board
 |
| On that mood board I was looking for something that I am interested. I collected that pictures from internet. here I put some vehicle and character and few castle images I was trying to get idea what is going to be the best to make. |
Mood Board
Of
Vehicle Design
 |
| I was thinking to do a vehicle but i was passionate to do something different as well. then I found that making a traditional vehicle is bit different even hard to get references images. but most of Asian country has that kind of vehicle. there is carriage, chariot, rickshaw, cow carriage. what I found here is making bulls or cows drawn a chariot is not common so am going to make that. |
Mood Board
Of
Creature Design

 |
| I found making a 3d character is going to very different for me because I have never done that before in 3d. last year i have done a few character but they all are in 2d . that's way that was my second think is to make a character. |
Mood Board
Of
Character Design
 |
| I was interested to make a character that fit on fairy character or creature or making a character that can fit with medieval warrior type character of movies and games. here this images are from internet. some of thous images are from sculpture and statue. and I have watched a movie is called Bahuballi some picture from there. |
Mood Board
Of
Environment Design
 |
| Here is my another choice to make an environment I was interested to make castle. I have also consider to make terrain, train station and mountain . |
2nd week 07th, March 2018
09/03/2018
Vehicle parts
I was working on some of my idea of vehicles. At first I made some sketches of parts of vehicle

12/03/2018
I didn't realise that vehicle is going to so easy to make it.But this are just my experiment.
 |
| I have tried to make that object by using my sketches. and they came up with very nice shape. |
 |
| this images after render |
 |
I was
thinking to make some traditional vehicle. I had plan to make Carriage,
chariot, rickshaw, cow carriage or that kind of vehicle. I was influenced by
some Indian vehicle. I have just draw some sketches on paper then I have
started using Maya software. By this technique I have gain some more skill on
Maya modelling. There is a model of hood of rickshaw that’s was the hardest
part. But I just made 1 then I copied rest of them. First I took square poly
then I click on one face then I just extended that in one way. I put them in
separate position then I build bridge between them. And the wheels was easy, I
took cylinder first then I made it like a pipe by cutting the faces of both
sides. Then I extrude that and from that extruded faces I took some faces to
make the spokes of wheel.
|
3rd week 14th, March 2018
14/03/2018
Silhouette of Creature
I have been looking for something interesting that's way I am making lots of silhouette to find my perfect project.
This silhouette were from statue or sculpture
 |
| Most of the silhouette I made them from sculpture picture. one of this is here is vehicle picture. I made it like that because of I found it is easy way to find perfect shape of any creature. |
 |

Unit 8 Project Proposal
Candidate
Name
|
Mohammad Nasim
|
BMC151645934
| |
Pathway
|
UAL Level 3 Diploma in Art and Design (Game Design)
|
Project Title
|
A Soul of Vengeance.
|
Section 1: Rationale
| |
For the present project I was influenced by a movie called Bahubali.
For the last project I have created an animation gif file from German expressionism art style and an environment. First I have made a background of environment then I started developing animation.
When the project is running, I have learnt to do Some drawing skill and learnt how to develop a concept art step by step such as use of golden spiral, rule of third, focal point, dominant from and sub-dominant from , lighting and leading line.
I have developed my skills technically in Photoshop and Maya 3D modelling skill. Mostly in Photoshop use of 3d option was kind of new for me.
going through this project I am hoping to develop my more 3D skill
I will try to touch all of them technical method just to keep myself up-to-date. Character modelling in 3d is going to be new for me so I will start that.
| |
Section 2: Project Concept
| |
I am planning to create a character that is based on medieval soldiers with Steampunk style. That character will have all that features from different sector such as medieval soldier look, creature stick look and steampunk character look.
I have made my mind to make that character in 3d Model because I have never made a character in 3d Model this is going to be totally new sector. I have already made lots of silhouette of my character some of them are just for creature design other are just for a sample character. I will consider creating some of additional object that will be related to my character.
   
the backstory of my project
As I got idea from a movie called Bahubali. My backstory can be similar with that type of war type movie. That can be fit on sci-fi story.
This story starts as follows a man lost and hurt and killed by his own kind, he is a man that’s been reborn many times and now seeks vengeance for his past and his future. His soul is trapped until he finds the person that has cursed him and kills them in order to break this cycle.
Game Genre
The art style of my character can be greatly influenced by genre, it is a horror, adventure, sci-fi, and shooter, Massively Multiplayer Online (MMO), LAN (local area network) or via the Internet, Simulations and Adventure. My game character can be fit in FPS or 3rd Person.
techniques/technical skills I have plan to use
I am planning to do a basic sketch of my character then I will make a final silhouette then I will draw individual parts of my character because I have to make that in 3d Maya software when I will finish my drawing of all parts of character then I will start developing in 3d software. For this project I will mostly use the Maya software beside I have to use Photoshop as well I might be use pencil and paper as well. I have been influenced by a movie called Bahubali. It is a medieval war type Indian movie.
| |
Section 3: Evaluation
| |
I will ask others to check my work and they will give their opinion.
And always try to capture screenshots of my work, might be for small stuffs like if I solve any problem I will record on VLC media player.
I will work extra time after college to manage my time schedule to successfully complete the project.
| |
Now I am going to make an action plan because If I want to finished this project in schedule time I must do some plan how am I going to do that.
Project Action Plan and Timetable
|
|||
Week
|
Date Week
Beginning
|
Activity / intending to do
|
Resources / workshops
|
01
|
28th of February
|
First of all I start doing some
research and collecting as many ideas for my FMP.
|
Web /
Google/
Books/
Visit Places
|
02
|
7th
March
|
I created a mind map and mood boards of
10 different ideas and picked about 25 from the 10 different ideas from my
mind map and I started creating silhouettes and experimenting.
|
Photoshop/
Web/
Maya
|
03
|
14th
March
|
I made 5 individual silhouettes of 4 of my different ideas, next I will focus and pick one idea that interested me
which was creating the character of a creature stick and medieval type StemPunk
warrior.
|
Photoshop/ Web/
Maya/
Pencil & paper
|
04
|
21st
March
|
I will create some sketches of some of
my character silhouettes and develop them further. Then I will choose one and
start creating a concept using Photoshop.
|
Photoshop/ Web/
Pencil & paper
|
05
|
28th
March
|
At this point I will be finalise my project and finishing the concept
so I will start modelling my Character.
|
Photoshop/ Web/
Maya
|
06
|
4th
April
|
I will be doing lot more research
while still modelling my character. I will start an artist interpretation as
well.
|
Photoshop/ Web/
Maya
|
07
|
11th
April
|
I will be looking at object which my
character will have. I plan to experiment them as well on my character. I will
see what sort of stuffs I can create and use for my character.
|
Photoshop/ Web/
Maya/
Pencil & paper
|
08
|
18th
April
|
I will be experimenting using Photoshop and Maya creating different
textures and object models.
|
Photoshop/ Web/
Maya
|
09
|
25th
April
|
At this point I should be modelling the character face in details or
body parts and objects.
|
Photoshop/ Web/
Maya
|
10
|
2nd May
|
Textures week in this week I should finish and start creating my textures.
|
Photoshop/ Web/
Maya
|
11
|
9th
May
|
I might be add some small object and touches to my work if I need to. Making
sure all textures are as real as possible.
|
Photoshop/ Web/
Maya
|
12
|
16th
May
|
I will start rendering my project as it might be take a while with all
the objects. Beside I will start my evaluation.
|
Word
Photoshop/ Web/
Maya
|
13 |
23rd
May
|
I will finish my evaluation by 25th of may.
|
Photoshop/ Web/
Maya/
Word
|
MIND MAP OF THE CHARACTER
 |
| Here I have made one more mind map for my character which I am going to develop more farther. It is easy to develop a character if you have a mind map of character. you can actually look for some reference images. |
4th week 21st, March 2018
26/03/2018
In this stage I am looking for my body shape and perfect pose for my character.
 | |
To get this pose I have been looking for action motion of human so I found that book is quite useful,
|
 |
In this stage I have started making sketches by following that pose

 |
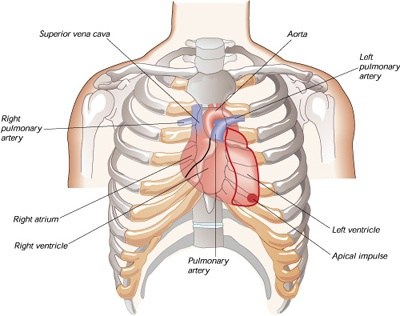
| This i s an anatomy of man torso I wanted to make his torso is going to rip-out. so that's why I had to do some research on torso. |
 |
| By this images I can understand now that where I can put the heart . |
 |
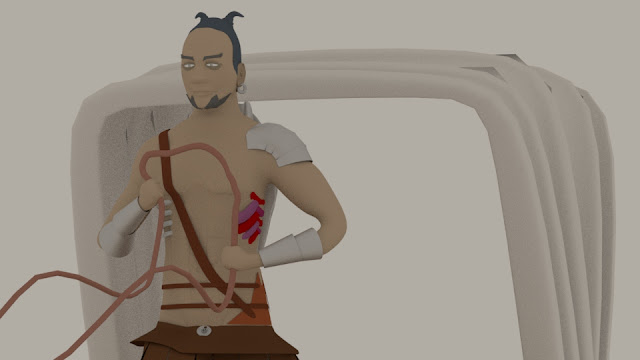
| here I started adding some features to make it look like creature. from the previous research I found make my character looks different I put his heart outside his chest and I put some bottom bones of chest just outside of his body. |
 |
| I will put 4 of his bone from the left side number 7,8,9 and 10 outside of his body |
 |
| I have made rectus abdominis outside of his body because I wanted show his skin rip-out |
 |
As part of making him terrible look I think that would be
perfect to make some muscle outside from his body. I have research on man
abdomen, I found that the serratus anterior muscle and rectus abdominis muscle
are quit useful for me to create that character. Those muscles I will model
them separately and I will put them outside of his body.
|
 |
| Here I have draw his left serratus anterior muscle same as before outside of his body. |
 |
| In this sketches I have just draw some other stuffs that I was thinking to put. shield at his back, belt and shield on his wrist. |
 |
| Here i was about to start my project but If I want to a 3D model then there is problem I have to get the perfect pose of picture of my character for X and Y view port on Maya. I could draw those pose but it was going to take so long to draw perfectly so I found easy way To get that pose I have used a free app called easy poser on my phone. in that app I made this pose and took some screenshot. |
 |
| In that app we can make the character pose very easily by moving his wrist, hip, elbow, knees , hands and head. |
I have to start from torso that's why I have find anatomy picture of torso because i have to add some other stuffs to that body so I need a perfect body shape of x and y view port of Maya.
 |
| Here I started making with torso first. I found that images in that website http://drawingacademy.com/drawing-lessons/muscles-in-human-body |
The Drawing Academy is an online Drawing Course and Art Community, where you can learn how to draw in the comfort of your home, and benefit from the support of Academy tutors and fellow students.
 |
| Here I have just start the developing the torso. |
 |
| This is the torso of body after render which I have just made. |

5th week 28th, March 2018
28/3/2018
 |
Here I have start developing the character I used the cylinder of
poly model then I cut the half of that. Before that I have used the image of
torso which has both side of view. That image can fit x and y both of view-port in Maya. Most of the time I have to work with the vertexes. I had to add more
vertex by using multi-cut tool. For the torso I had not to extrude anything.
The hard part was to make his abs because for his abs I had to make it like
real abs because of I will have add texture of rectus abdominis muscle. I have
just made half of his torso. After finishing that rest of the half I have just
copied by using duplicate special from the edit option of top menu bar.
|

Analysis
I have found my character position from Eadweard Muybridge, 1955, The Human Figure in Motion New York: Dover Publication, INC. I was looking for some action motion on that book. I found that action from boxing section. I choose that position because of I wanted to show my character as a revenge expression. I have drawn some sketches of my character. I will do some more lately. For making any character either in 3D or in 2D we have must need a models. I already got that how would my character should look. It was going to perfect to make a 2D character but I was doing 3D model so I need at list 2 of my perspective view of my character position.
To get that position I have used an app called easy poser. The speciality of that app is if you want a specific pose for your character you can get that from here because it has bodies of female, male and kids. Those bodies has got moving control of their knee, elbows, legs and hand etc. I have download that on my phone then I made my pose and I took some snap shoot of character pose. To make my torso I have used anatomy sketches of different views it has showing abdomen and all the nerves. I choose that because I will make some of my character nerves came off from skin. I have to make my character as a dead man that’s way character will have some creature stick look. To make that I thing that idea would be perfect.
30/3/2018
 |
Here I have found a problem, I have mention that I have used the
duplicate option to make whole torso of the body By making that way it’s not
easy because if we make that duplicate that means it is an object even if I
want to try to edit something from both side of the torso I can’t, to do that I
have to make them both as same object then I have turn on the object X
symmetry. Rather than this way I found better way to do that, using the mirror
option If we make any object by simply using the mirror option there is lots of
benefit, such as most of the game character are made half but mirror make them
whole. I think most of the game engine do not count the polygon that much of
mirroring portion or count the less poly. By the using of duplicate way or the
copy way game engine will count the poly of his whole object.
|
6th week 04th, April 2018
5/4/2018
Easter Holiday
Over Easter I have visited some places and walk around Birmingham Broad Street area where I found sculpture I have taken pictures.


I have visited a shop of sculpture before Easter to get some idea of my character some I have posted in mood board


Over Easter I have started working on head

| Over the Easter holiday I have tried to finished the head |
7th week 11th, April 2018
Developing the legs and the hands

At this moment I have started working on legs & hands. First I
just made a sample shape of legs and hands by extruding the cylinder. Before
that I have to cut the image which I have got from Easy poser app, I had to cut
that from two different view for the view ports, one is for X and the other one
is for the Y view port. After that I have start to merge the vertexes of both
legs with the torso’s Waist and hand with torso’s shoulders.

8th week 18th, April 2018
18/04/2018
Foot making process
 |
| Screenshot of the processes of making shoe. |
 |
| Here I have just seen that how does it look like after I rendered it. |
20/04/2018

To make the foot I took a picture of foot from internet from the easy poser image I have got foot images as well but it has not proper details on it. It is just sample plain model. For the foot making processing I need a picture with more details, that’s way I took the upside picture for the Z view port. And I had to use the easy pose image for the Y view port. Foot was not easy to make because of his shape and some fingers but i did not had to worry about that because of I have made shoe of that character directly from his foot shape. I made the half the shoe first then I just mirror that shoe after that I had to edit and add some more vertex at the front side. Both the shoe are same so I had just mirror them.

Here I have start developing some stuffs of his torso.
 |
| I found that images from this website https://www.realmofhistory.com/2017/05/26/12-warrior-armor-ensembles-history/. They have lots of information about ancient history. |
From now I am going to add some of the related cloth of ancient time.
according to that images I will add the Dangly straps, belt and tunic. but the bottom of tunic.
 |
| serratus anterior muscle, bones and I have add some kind of tunic cloth. |


To make the bones and serratus anterior muscle I have used the cylinder and extrude that to make it curve shape. And I put them where they suppose to be but the outside of his body.
23/04/2018
This is a fist making processes
 |
In
that images you can see I have two type of hands. I have made the first one
which is attached with his wrist just by extruding the wrist faces and the
edges. We can see that clearly rather than the first one the 2nd one is the
best looks as fist. what I have done here is I have not been done any research
for the first one even I did not look for any images How the fist going to be
look like when it is going to holding a rope. That why I had to make another
one hand fist.
|
 |
| Rendered image |
 |
For
the fist I have visited the website called line of action just to get some fist
images. They have plenty of images which are people are posing for hand and
some of them I found that they have holding something. So I took all of the
images which has holding something although there was not any images that was
exactly same as I have looking for. I have analyse that how there hands would be
look like if they are holding a rope. Then I have finally came up with an idea
I am going to use some of the images as a reference. So I am going to take
picture the one with holding a briefcase and one with holding a stick, that's
how I can get the proportion of both side of hand.
|
 |
Here
I have took one more new file of Maya because I need to put the fist images on
to X and Z view port and the model need to be in the middle of the world
grid. I put tow images in the port Z and one in X view port. The reason why I
have put tow images together in z port is I need to see both side of a hand. While
I was working I used to hide half the hand and one image.

The
fist was quite complicated to make because of fingers. So I have used the cylinder
to make that fist I had to add lot vertex by using the multi-cut tool. At the
bottom line of fist I have just made bridge between the two sides of edges. And
it’s automatically came up the shape of fist when I press the two button in the
keyboard, the two button make the object more smooth.

I have rendered that fist and it came up like that.


Here another hard part of the fist to merge all the vertex
of the fist with the vertex of wrist of the character. Although my both wrist
and hand was made by cylinder shape there is slightly different between them
with the vertexes wrist has less vertex from the hand. All I had done here is I
used the target wild tool to marge all of the vertex and I have found some
extra vertex which I have vanished with the tool target wild.

After I rendered from both angel

9th week 25th, April 2018
Head making proceses
25/04/2018

I have been looking for some angry faces. That’s why I have been
through the line of action website again. Although I did not find enough images
of angriest but those are going to work for me because those have that faces
what I have been looking for. I have been looking for very natural angry face.
 |
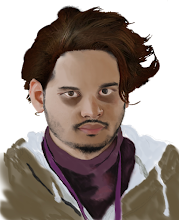
For the further development of the head I have took few
pictures of my head from the different angels. From them I have selected two of
them for the X and Z view port. I had to customised both of them selected
pictures to make there height and width similar. I put some red line under and
the top of the ear and to the nose.
|

Here I have used the
cylinder to make the whole of his head I have cut the half of it. I have
started moving the vertexes and I had to add lots of vertex by using multi-cut
tool.


The way it’s came up I was not happy enough with the result because
the back part was come up kind of cylinder shape. Even If I have press two key
on the keyboard it’s still shows the cylinder type of shape.


Finally I have decided I will make a new one with polygon
sphere. Then I have started working on new Maya file I put my customise picture
on Maya X and Z view port. I found that is quite easier then before. It’s already
came up with shape of head. Then I had cut the half of it.


At this stage I have hide the back side of head faces by
simply pressing ctrl+H then I have started working on the face of that head.


on his eye portion I have put a little polygon sphere just to know where his eye position.


Here I have started developing his mouth. making a shape of lip was quite heard. I had to add couple of vertexes by adding edges from multi-cut tool.

Hear I was making nose, for nose I have just add few more edges.

Making
head was not that heard I found that quit easy to make. I found a technique if
we want to model any complex object like head we just have to make sure that we
have perfect images for all the view ports and the first thing need to do is
take a similar type of polygon shape and started developing his edges making
them straight line by following this images, then the shape will come up with
same kind of basic shape automatically of this images. Then we have to work to get more details. Here I have rendered that half face, I found that it is going
to be all right to add with his body.


I had made the head in different Maya file that's why I had to import the Maya head file into the Maya body file. after imported that file the head came up in the middle of the body it has make my way easier I just had to drag up the head to neck. Although that head is quite big I have made that small as a shape which is going to adjust with his body.

Here I have started merging the vertexes of his body and his his head. although his head has more vertex rather then his body I had to fix it by getting rid of some vertexes. I had to add few more edges in his neck. before starting all of that I had to made a hole in his head because there were no hole in his head by deleting some faces, head was a round shape. Then i have made both the object as same object by using combine option from the modelling toolkit bar. after that I have started merging the vertexes by using the target weld tool. after all of that added it came up with smooth shape of neck.


I have post some pictures of his neck form different angle.
 |
| From the front side |

From the back and side looks of neck.

21/04/2018
Ear making process
I was looking for some images of ear then I realise if I made the ear in same Maya file where I have made the head that is going to be easy I have had images of my ear and even they have already customise as same size.

To model the ear I have started with the polygon sphere. I took the sphere because our ear has got round shape and if you see at back of ear you can see the ear is bit look like mountain. First I put the sphere in his place then I have started placing the edges in similar to my ear shape because some vertexes I have to dragging in and some of them I have to pull them out to make a shape of ear.


After I have finished my character ear I have rendered it and It came up very real stick in above picture. I all so did a little experiment with the ear as I have made the ear in same Maya file of head. I have mirrored both of them head and ear and then I have rendered.

After It has rendered

Here I have imported the ear Maya file in my character body Maya file. here I had to make it small and put this in his place.

And I have rendered Character.

Experiment of Hair Making
I have draw few sketches of hair, eyebrows, beard and mustard.

I have done an experiment before I made the hair, I have took screenshot of the character from the Maya file then I put that in Photoshop. I have started experimenting all of the sketches of hair, beard and eyebrows. I found that two pone tails with the beard but not in the middle of jaw. I found that quit different I have never seen that before and even it is matched with his face.

I have started developing The hair in same file of body. first I took the polygon sphere and make it as same shape of the character head and cut faces from the front side and ear side. I have shaped it as where our hairs are grow. here you can see it's whole but I actually mirrored that.
30/04/2018

Hear I have rendered the hair, beard and eyebrows from different angels and with whole body.


 |
| Front Looks |
 |
| Bit far from the down view |
 |
| top view |
 |
| At the back side |
 |
| Bit far from the down view to the other side. |
 |
| Close side view |
 |
| From the bottom to top view |
 |
| From the far back |
Eye making
 |
| I need to know some basic name of the eye parts. from that picture I can say I have to make Sclera, Pupil and Iris. |

For eye making I have used same technique which I have used for the ear making. here I have used 2 polygon sphere and one polygon plane. by the polygon sphere I made both of them slim and bit flat and the plane polygon I have just extrude it's all edges according to how the picture of my eyelid is leading.
 |
| Hear i have just rendered the whole eyelid. |

Here I have done a small experiment with whole eye, I have rendered all of them head and ear and eye together to see how does it look like after it's rendered.


This images I have took after attached the eye to his face.

10th week 02nd, April 2018
That was vehicle I have made that before I start that the character making. so I planing to use that for my character presentation.


I have add few colour to make it more attractive

Here I have imported the vehicle in to my character Maya file.

At this time I have made the rope larger and made it like it's waving.
It was easy to make, I had to extrude the edges and bend it a bit.

I have add a skydome light and add a picture to the skydome to get best reflection of the object.
I have got the sky picture form that website http://vterrain.org/Atmosphere/Domes/.


11th week 09th, April 2018
Texturing the Character
Texturing the Character
11/05/2018
I am going to UV the whole body separately because I don't
have to texture the whole body I just need to texture some parts from his body.


First I took all the faces from his torso part then I have
UV it.
I also have to texture his beard and hair. So that's why I have UV that as well.
I also have to texture his beard and hair. So that's why I have UV that as well.
I have texture the eyelids as well because I have to put
some dark colour underneath his eyes.


Here First I separated all the parts from his head then I
have UV the whole head.
After that I took all the faces from the character face then I have UV them again.
After that I took all the faces from the character face then I have UV them again.


All of this images I have collect from UV editor in Maya by taken snapshot
Here I have started UV mapping by opening the UV editor
window. I have decided that I am going to texture some parts and some parts I
will leave upon how they already coloured because after finishing my modelling
character I put a specific colour to identify and I found some colour are quit
matching. I have UV his face and his body separately even from his
body I have UV mapping his torso separately as well because I have to put some
texture on his abdomen and his face.
 |
| https://copicmarkertutorials.com/anatomy-academy-ink/ |


 |
| Austin Amelio From walking dead |
For my character face I was thinking to do some burning
texture which gives us an impression that he is an angry person. I have found something that influence me. I
found a character called Austin Amelia from walking dead American drama series.
Basically Austin Amelia’s face is look like burned on that series. So I want to do something similar to that for my character.
I have used that character as references. And I put some similar texture to my character face just to make his face looks burned.
Basically Austin Amelia’s face is look like burned on that series. So I want to do something similar to that for my character.
I have used that character as references. And I put some similar texture to my character face just to make his face looks burned.
 |
| Here are some texture which I have used for my character. I have used that rope as a pattern to make his looks opened. I have made that texture on Photoshop. |
 |
According to the UV map I have made some texture in
Photoshop.
Here I have made torso with more detail but his other stuffs like hair and beard I did not give that much details. To making his torso looks ripped I have used gradient colour, soft and heard brush to make his torso looks ripped. |
 |
| This this a screenshot of the Maya file |
 |
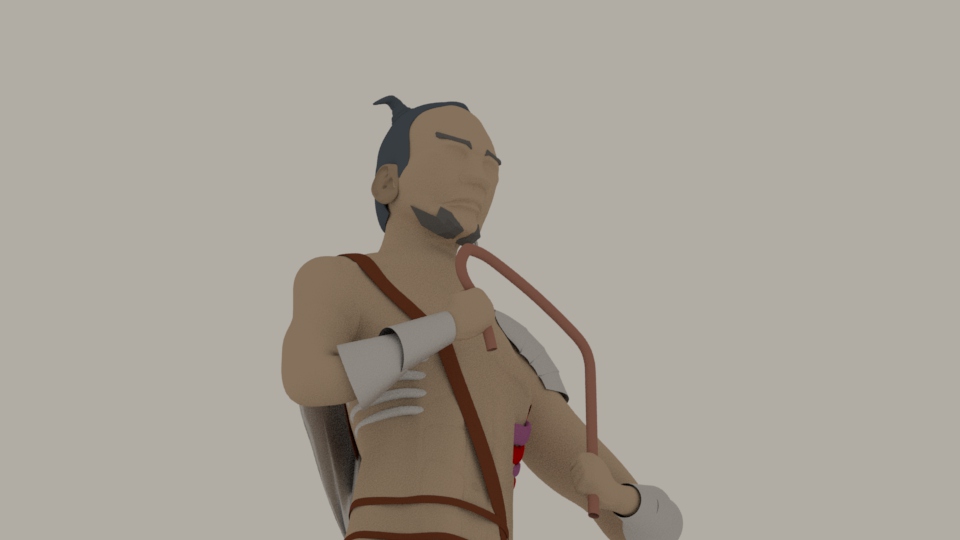
| This is a rendered picture. |


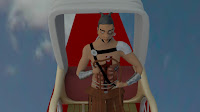
Here I have posted some pictures with imported
vehicle.
I have posted some pictures from different angles as well.


14/05/2018


Here I have been looking for the perfect picture from a specific angle.
12th week 16th, April 2018
18/05/2018


I have finally found a close caption of my character rendered image.

Evaluation of project
I have been looking for some
artist painting of chariot art,
because I have add a chariot to my
character I have to find an angle of rendered images where I can show my
character whole body.
 |
Apollo In The Chariot Of The Sun By Frederik Arthur Bridgman Wall Art
website https://www.greatbigcanvas.com/view/apollo-in-the-chariot-of-the-sun-by-frederik-arthur-bridgman,2229102/
|
 |
Celtic Chieftain Chariot
website https://www.puttyandpaint.com/rusto
|
 |
Celtic Chariot
http://gazarts.co.uk/Gallery/Welsh/Cwchwlin-Penarwr/Celic-Chariot.html |
All I have been searching for
chariot I found most of them are showing the only half part of the body
but my focus was on character not on chariot I have just added to make it more
attractive. I have found lot of art work that quite similar to my character.
some of them has got some other stuffs added into their painting, you can see the
first one they have add some rocks and a dog and second one is just only image
with character with his chariot I need something similar to 2nd one but second
one has showing his upper part only but I need to show most of my character
body parts. I could show my character with chariot however the focus point of
character is going to be from so far.
Egyptian
war chariot ancient war art

Egyptian Chariot is a painting
by Corey Ford which was uploaded on October 16th, 2015.
Ancient War Art by Mark
Beerdom
Website of 1st one
https://www.pinterest.co.uk/pin/322077810832905149/
https://www.pinterest.co.uk/beerdom/ancient-war-art/
Egyptian Chariot is a painting
by Corey Ford which was uploaded on October 16th, 2015.
Website of 2nd one
https://pixels.com/featured/egyptian-chariot-corey-ford.html
I have done some research on some Egyptian
Chariot of ancient time, I found one caption here quite useful to me if you look
at the 2nd painting of the Egyptian chariot art you can notice that focusing
point is on character. Although his body is covered by chariot's front part. That’s
not problem for me because my chariot is more like a carriage, I do not
have the front part. I can show my character whole body but I must need more
close shot of rendered image.


13th week 23rd, April 2018
23/05/2018


So I have done few sketches and have done some research about warrior of ancient time. I had to do some research about human anatomy. I had to find a pose
I could have use some sample technique about
making hair and to get that specific pose I could use the rigging process. I
have discussed with my teacher about learning them technique but she suggested
me if I did not want to learn that in rush then I should have make that model
in his pose. And I have decided not to do that way because I might not have
enough time to learn. so that's way I have used my own technique I used a
polygon sphere to my characters head then I have caught the half of it and make
a shape like hair and then I have just textured that hair.
To get my character shape, I have to get a pose. I have used an app called easy poser by that app we can get any pose how we want it.
25/05/2018
Evaluation
Evaluation
This project provides us to explore
with our technical skill and with an opportunity to improve our portfolio and
extend our creative minds in a direction which we have identified as important
for future creative development.
This project is catered to allow us
to decide what technical discipline we wish to improve on based on previous
projects we have done this year.
We have been offered the following:
Interior environment:
Creating an interior environment
consisting of a whole or section of a room. You must consider the use of the
space and create props and assets that match this theme, setting and function.
Research points to consider are architecture, interior design, interior
lighting and functionality.
Urban Exterior Environment:
Creating an exterior environment
consisting of a single building or a range of multiple buildings and street
furniture assets. Research how the environment is used and the effect this may
have on the textures used. Research points to consider are architecture,
potential modular structures, light sources and gathering real life reference
images.
Prop/ Asset:
Choose a single or collection of
assets. You must consider detail, texture, form, structure, functionality.
This project is geared towards and
will be considered for display at the end of year show, so work must be
produced with display in mind.
Personally I have considered myself
on this sectors making a game or a concept art of a character, environment,
vehicle and creature or a 3D model of a character, environment, vehicle and
creature or an animation.
After making lots
of silhouette and sketches finally I have decided that to
make a character.
I have made a character that looks
like ancient type warrior with a creature look. I was influenced by an Indian
movie called Bahubali it has got two series Bahubali the beginning and the
Bahubali the conclusion. The first part was published in 2015. That
Indian action film was directed by S. S. Rajamouli. The
film was produced by Shobu Yarlagadda and Prasad
Devineni and was shot in Telugu and Tamil. The film star
Prabhas is in the lead role.


I am not actually influenced by any
character or anything that part of this movie. I have actually influenced by
the story of that movie. The story was about a son who is taken a revenge against his uncle who is a king and who has also killed his father. I have found
similar story for my character. My character back story is that character is
going to take revenge but he is not going to be his son perhaps he is going to
be himself. He has come back after a decade for taking a revenge with his
warrior suit and his chariot after he is being killed by the king.


To make that kind of character I
had to make sure that all the clothes and stuffs need to be in ancient type.
And I have decided that to make my character feature looks will be look like a dead person.
So I have done few sketches and have done some research about warrior of ancient time. I had to do some research about human anatomy. I had to find a pose
For my character. To make my
character I had two choices. I could make that in 3d or in 2d. I found make
that character in Maya 3d is going to be quite challenging and new.
I have designed some character and creature in 2D last year. I thought making 3d modelling would be very exploring and new. That's why I have decided that I will make a character. So I have started developing my character, first I have made an action plan then a mind map then started developing with making some sketches and silhouette then I have started developing them in Maya. First I have made the torso, then hand and lags then head. I have made all of them with polygons for some parts I had to use the polygon sphere, cube and polygon box. Some accessorise of warrior he is wearing I have made them very easy and quick, because they are very sample stuffs with very less dimension. The more dimension we have then the more work we have to do. This stuffs are shields, e-ring, belt on his torso and his back, bones, rope, heart, ear and some muscles. To make this stuffs I just had to use the polygon cube and extrude it in his shape. For some stuffs I had to use the cylinder, specially the bones, muscle, some shields, and rope. For the ear I had use the polygon sphere and torus for an e-ring and a shield which is on his arm. After I had made this stuffs I had pressed the 2 key button on key-bored in Maya
I have designed some character and creature in 2D last year. I thought making 3d modelling would be very exploring and new. That's why I have decided that I will make a character. So I have started developing my character, first I have made an action plan then a mind map then started developing with making some sketches and silhouette then I have started developing them in Maya. First I have made the torso, then hand and lags then head. I have made all of them with polygons for some parts I had to use the polygon sphere, cube and polygon box. Some accessorise of warrior he is wearing I have made them very easy and quick, because they are very sample stuffs with very less dimension. The more dimension we have then the more work we have to do. This stuffs are shields, e-ring, belt on his torso and his back, bones, rope, heart, ear and some muscles. To make this stuffs I just had to use the polygon cube and extrude it in his shape. For some stuffs I had to use the cylinder, specially the bones, muscle, some shields, and rope. For the ear I had use the polygon sphere and torus for an e-ring and a shield which is on his arm. After I had made this stuffs I had pressed the 2 key button on key-bored in Maya
Then they became objects.
After finishing my modelling I had
to texture some of the character body parts. For the texturing I had to use the
Photoshop. I have made some texture according to the UV map.
To get my character shape, I have to get a pose. I have used an app called easy poser by that app we can get any pose how we want it.
 |
| It's an android app. |
This app has got a model and we can
move all of his body parts.
It’s allow us to take a screenshot
of pose.
Even they have model of male,
female and children.
I have used just the male one.
It was very effective app for an
artist, as an artist we often need a model to draw any character or making any
3D modelling character.
For this project I had to done lots
of research, researches helped me to understand perfectly to get my character
done. Couple of times I had to do some experiment to finish my character hair,
beard and ear. By experiment I got to know that where am I in a track or I am
going in wrong way.
If I would know much more about
Maya tools about rigging, nHair and nCloth. Then I could have use them to make
my character hair or for other stuffs very easy and shortest way. Next time if I
would make any character I will try to use them as much as I can to make my
project easy and short. About my character hair I do not personally prefer it
the way it's built but I like the style because it's suit with warrior outfit.
I think it would be looks more perfect if it could make by the process of
nCloth. In conclusion over all I found my everything of this project is perfect.
25/05/2018
Proposed Research Sources and Bibliography (Harvard
Format)
|
Galleries/Museums
I have visited some places around Birmingham to collect some picture of statues and I went some shop where we can find statues.
        
Books:
I have to look some art or drawing
books to get some knowledge about the shape of human body That include
technical guidance books, such as software ‘How To’ guides, Graphic Novels, Fiction texts etc.
I have used this two books to get some information about my character.
Eadweard Muybridge, 1955, The Human
Figure in Motion New York: Dover Publication, INC.
Jane Stanton,1989 The art of life
drawing, Milan: Printed in Portugal by Printer Portuguesa Graphica Lda.
Magazines/Periodicals
I follow some website that relate art
work and follow some artist work and keep eye on their work. These include 3D Artist, 3D World, PC Gamer, 2D Creative Photoshop Artist, Nintendo Magazine, Artists & Illustrator Magazine, Computer Arts
Magazine (illustrators).
https://www.mcmcomiccon.com/birmingham/ https://www.nintendo.com/ https://www.blizzard.com/en-gb/ https://www.artstation.com/ https://www.ubisoft.com/en-gb/ https://www.pinterest.co.uk/ https://theblog.adobe.com/ https://www.creativebloq.com/ https://line-of-action.com/ Especially for this project I mostly checked on YouTube about different or an upcoming news such as Science, technology nature and wildlife magazines.
website
              |
1 comment :
http://bapse.com/
Post a Comment